狗儿

热爱的话就坚持吧~

0%

VPS指定文件夹自动上传到OneDrive

主要是利用这个机会练习shell

写在前面

由于微软的旧API已经停止使用,本文失效。狗儿决定改用阿里云的OSS来备份。还要用onedrive的朋友可以参考:一个好用的OneDrive网盘上传工具,支持文件和文件夹上传

本文除了最后一部分的shell脚本外,其余内容均转载自VPS上传文件到OneDrive网盘脚本,可配合Aria2实现自动上传,Rat大佬是一个很nice的博主,帮助了很多刚入门的菜鸟解决问题,在此表示感谢。

原文本是实现Aria2下载文件后自动上传至OneDrive,因我的需求是定期将博客图片、数据库等内容上传,所以重写了最后的那个shell脚本。

shell之前没接触过,昨天才开始学习,所以写的可能比较难看,希望可以谅解:)

说明

我们从VPS上传文件到OneDrive网盘的方法很多,包括Rclone挂载,OneIndex程序的上传功能,不过2个在上传的时候都还是有点BUG,前者会出现丢文件的情况,后者也会出现上传失败,都不是很理想,这里博主再介绍个OneDrive上传脚本,几乎不会出现上传问题,很好用,由萌咖大佬制作,并将其适用于Aria2的自动上传,这里说下具体操作。

方法

Github地址:https://github.com/0oVicero0/OneDrive

脚本特性:脚本支持文件夹上传,支持获取文件的匿名直链,且只适用于OneDrive非个人版。

1、安装脚本
安装curl,用于访问API

1
2
3
4
5
#Ubuntu和Debian系统
apt-get install -y curl

#Centos系统
yum install curl -y

运行命令安装脚本:

1
2
#为了方便小白,本脚本内置萌咖大佬永久有效的应用参数,可以直接使用,如果你不放心可以自己获取参数,不过可能会遇到很多坑,建议直接使用脚本默认的参数
wget --no-check-certificate -qO- "https://raw.githubusercontent.com/0oVicero0/OneDrive/master/OneDrive.sh" |bash

本脚本需要三个参数Client IDSecretReply URL,均需要在/usr/local/etc/OneDrive/onedrive.cfg文件里修改,参数获取看下面,当然你也可以不用管,直接进行步骤3

2、获取参数
先访问Microsoft Azure Management Portal,然后点击左侧菜单栏中的Azure Active Directorg,选择应用注册,再点击页面上方的新应用程序注册。
请输入图片描述
输入名称如:OneDrive for Linux,应用程序类型选择Web应用/API,填入登陆URLhttps://login.microsoftonline.com/,再点击创建。
请输入图片描述
然后点击刚刚创建的应用程序,复制应用程序ID,即脚本需要的Client ID参数,再点击左上角的设置。
请输入图片描述
然后进行如下修改:
请输入图片描述

1
2
3
4
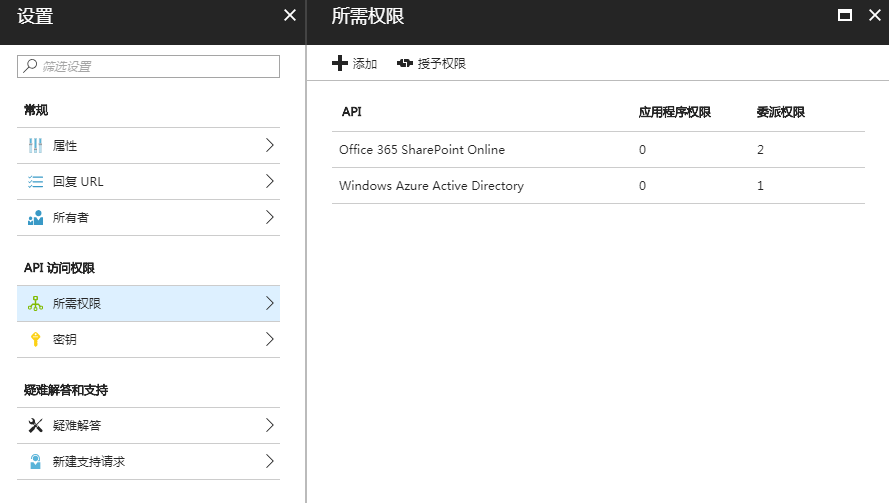
#点击右边的回复URL,将其修改为:https://onedrive.live.com/about/business/,即脚本所需要的Reply URL参数。
#点击所需权限,点击Windows Azure Active Directory确认是否已选中Sign in and user profile,如果没有则选中并点击完成。
#点击上方的添加,点击选择API,选中Office 365 SharePoint Online,并点击选择。在选择权限中选中Read user files 和Read and write user files,并点击选择。点击完成按钮,并关掉此小窗口。
#点击密钥,填入密钥描述,如:OneDrive,选择年限1年,点击保存,再复制密匙,即脚本所需要的Secret参数。

不过这里说下密匙(Secret参数)填写的一个坑,由唯一度博主填平。就是当我们获取到带+号的密匙时候,我们需要使用编码符号,把+改成%2B,然后再填入脚本里,不然最后会出现Something went wrong, here is the API response的错误,导致验证失败。

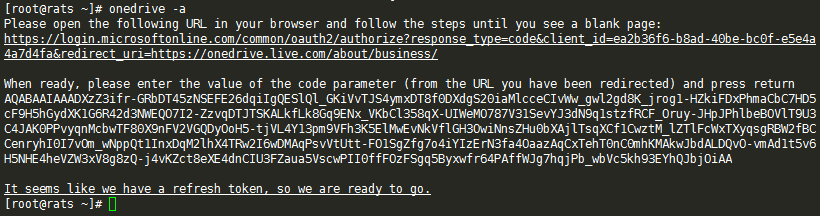
3、运行账号认证程序
运行命令onedrive -a,将返回的网址复制到浏览器打开,再登陆你的OneDrive for Business账号,登陆成功后复制地址栏中的地址(复制包括localhost的所有链接地址),粘贴到SSH客户端里,敲回车键即可。
请输入图片描述
如果返回以下字段:It seems like we have a refresh token, so we are ready to go,那就恭喜你,设置成功!

1
提示:如果你遇到bash: onedrive: command not found错误,则需要找到/usr/local/etc/OneDrive文件夹,修改onedrive和onedrive-d脚本,在第二行都加上export PATH=/usr/local/bin:$PATH代码,再保存就行了。

使用

1、使用命令

1
2
3
4
5
6
7
8
9
10
11
12
13
14
15
16
17
18
19
20
21
22
23
24
25
onedrive --help

#####################################################################
Usage: onedrive [OPTIONS] file1 [file2...]
onedrive-d folder

Options:
-d, --debug Enable debug mode
-a, --authorize Run authorization process
-f, --folder Upload files into this remote folder
-c, --creat Creat remote folder.
Directory names are separated with a slash, e.g.
rootFolder/subFolder
Do NOT use a trailing slash!
-h, --help Show this help
-r, --rename Rename the files during upload
For each file you specify you MUST also specify
the remote filename as the subsequent parameter
Be especially careful with globbing!
-s, --silent Silent mode for use in crontab scripts.
Return only exit code.
-ls,--list Show the itmes in this directory.
-l, --link Show the file share link.

#####################################################################

2、命令示范
如果我们要上传/root文件夹里面的moerats.txt,使用命令:

1
2
3
4
5
6
#此命令默认上传到OneDrive根目录
onedrive '/root/moerats.txt'

#如果上传到指定文件夹,就需要加-f参数
onedrive -f RATS '/root/moerats.txt' #上传到OneDrive根目录的RATS文件夹
onedrive -f RATS/RATS '/root/moerats.txt' #上传到OneDrive根目录RATS文件夹里的RATS文件夹

如果我们要将/root文件夹及里面的文件夹和文件一起上传,使用命令:

1
2
3
4
5
6
#此命令默认上传到OneDrive根目录
onedrive-d '/root'

#如果上传到指定文件夹,就需要加-f参数
onedrive-d -f RATS '/root' #上传到OneDrive根目录的RATS文件夹
onedrive-d -f RATS/RATS '/root' #上传到OneDrive根目录RATS文件夹里的RATS文件夹

如果我们想直接查看OneDrive网盘目录的文件,使用命令:

1
2
3
4
#此命令只查看根目录文件
onedrive -l
#如果我们要查看根目录root文件夹里的文件
onedrive -l /root

请输入图片描述

Aria2下载自动上传脚本

原理是当下载完后aria2会给脚本传3个参数$1$2$3分别为gid、文件数量、文件路径。我们对文件路径这个字符串处理一番就可以达到目的了。

新建脚本文件rcloneupload.sh,并复制下面代码:

1
2
3
4
5
6
7
8
9
10
11
12
13
14
15
16
17
18
19
20
21
22
23
24
25
26
27
28
29
30
31
32
33
34
35
36
37
38
39
40
41
42
43
44
45
46
47
48
49
50
51
52
53
54
55
56
57
58
59
#!/bin/bash

GID="$1";
FileNum="$2";
File="$3";
MaxSize="15728640"
RemoteDIR=""; #上传到Onedrive的路径,默认为根目录,如果要上传到指定目录,方法看文章最后面。
LocalDIR="/home/www/download/"; #Aria2下载目录,记得最后面加上/

if [[ -z $(echo "$FileNum" |grep -o '[0-9]*' |head -n1) ]]; then FileNum='0'; fi
if [[ "$FileNum" -le '0' ]]; then exit 0; fi
if [[ "$#" != '3' ]]; then exit 0; fi

function LoadFile(){
IFS_BAK=$IFS
IFS=$'\n'
if [[ ! -d "$LocalDIR" ]]; then return; fi
if [[ -e "$File" ]]; then
if [[ $(dirname "$File") == $(readlink -f $LocalDIR) ]]; then
ONEDRIVE="onedrive";
else
ONEDRIVE="onedrive-d";
fi
FileLoad="${File/#$LocalDIR}"
while true
do
if [[ "$FileLoad" == '/' ]]; then return; fi
echo "$FileLoad" |grep -q '/';
if [[ "$?" == "0" ]]; then
FileLoad=$(dirname "$FileLoad");
else
break;
fi;
done;
if [[ "$FileLoad" == "$LocalDIR" ]]; then return; fi
if [[ -n "$RemoteDIR" ]]; then
Option=" -f $RemoteDIR";
else
Option="";
fi
EXEC="$(command -v $ONEDRIVE)";
if [[ -z "$EXEC" ]]; then return; fi
cd "$LocalDIR";
if [[ -e "$FileLoad" ]]; then
ItemSize=$(du -s "$FileLoad" |cut -f1 |grep -o '[0-9]*' |head -n1)
if [[ -z "$ItemSize" ]]; then return; fi
if [[ "$ItemSize" -ge "$MaxSize" ]]; then
echo -ne "\033[33m$File \033[0mtoo large to spik.\n";
return;
fi
eval "${EXEC}${Option}" \'"${FileLoad}"\';
if [[ $? == '0' ]]; then
rm -rf "$FileLoad";
fi
fi
fi
IFS=$IFS_BAK
}
LoadFile;

授权chmod +x rcloneupload.sh,然后再到Aria2配置文件中加上一行on-download-complete=/root/rcloneupload.sh即可,后面为脚本的路径。最后重启Aria2生效。

文件夹定期上传脚本(原创部分)

这一部分是我的原创,借鉴了上面的Aria2自动上传脚本。

1
2
3
4
5
6
7
8
9
10
11
12
13
14
15
16
17
18
19
20
21
22
23
24
25
26
27
28
29
30
31
32
33
34
35
36
37
38
39
40
41
42
43
44
45
46
47
48
49
50
51
52
53
54
55
56
57
58
59
#! /bin/bash
RemoteDIR="backups"; #上传至onedrive的RemoteDIR目录
uploads[0]="/www/wwwroot/blog/usr/uploads"; #上传本地的uploads文件夹
uploads[1]="/root/sh";

function Init(){
uploaded=`cat /root/sh/uploaded.log` #记录上传过的文件/创建过的文件夹
#FileLoad=${File##*/}; #/www/wwwroot/blog/usr/uploads的结果为uploads
if [[ $uploaded =~ $File ]]
then
echo "${File}早已创建";
else
echo "onedrive -c ${RemoteDIR}"/"${File##*/}";
eval "onedrive -c ${RemoteDIR}"/"${File##*/}"; #创建文件夹
if [[ $? == '0' ]]; then #若eval的语句返回成功
echo ${File} >> '/root/sh/uploaded.log';
fi
fi
}

function upload(){
for file in `ls $1`
do
dir=$1"/"$file;
remote_dir=${RemoteDIR}${1#`dirname $File`};
if [ -d $dir ]
then
if [[ $uploaded =~ $dir ]]
then
echo "${dir}早已创建";
else
echo "onedrive -c ${remote_dir}"/"${file}";
eval "onedrive -c ${remote_dir}"/"${file}";
if [[ $? == '0' ]]; then
echo ${dir} >> '/root/sh/uploaded.log';
fi
fi
upload $dir; #递归子文件夹
else
file_path=$1"/"$file;
if [[ $uploaded =~ $file_path ]]
then
echo "${file_path}早已上传";
else
echo "onedrive -f ${remote_dir} '${file_path}'";
eval "onedrive -f ${remote_dir} '${file_path}'";
if [[ $? == '0' ]]; then
echo ${file_path} >> '/root/sh/uploaded.log';
fi
fi
fi
done
}

for File in "${uploads[@]}"
do
Init;
upload ${File};
done

1569574382684

定时任务我使用的宝塔,主要是管理方便。

将脚本粘贴进来,选择执行周期。

可以点击执行,看看有无问题。